
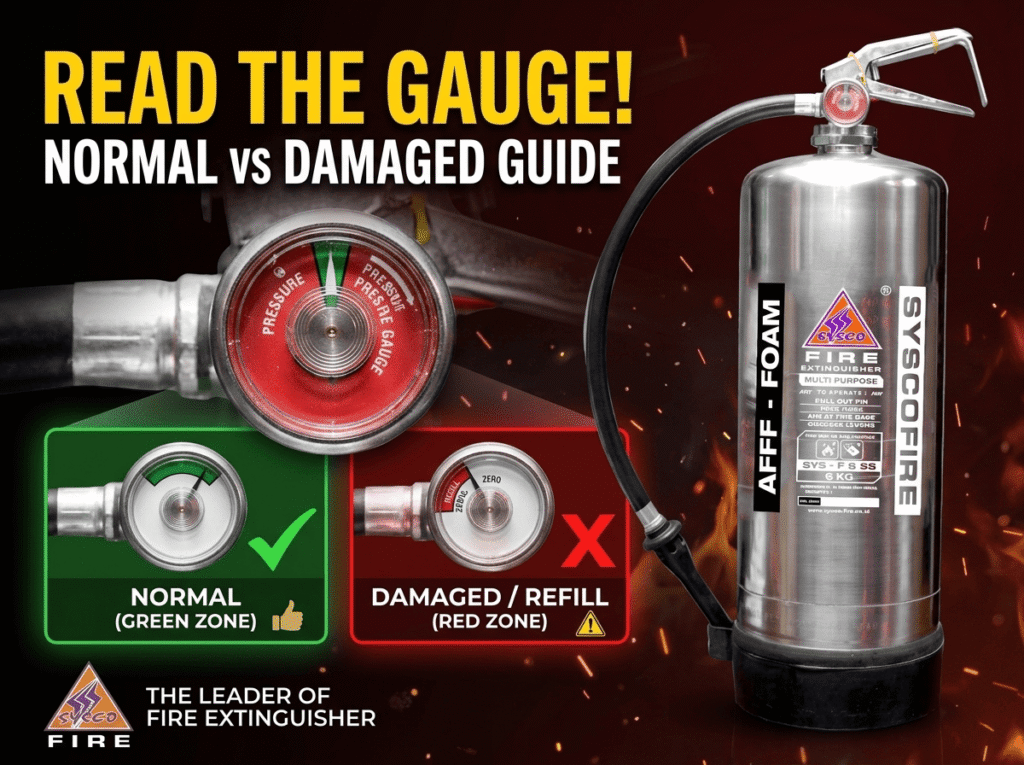
In an active fire emergency, seconds count. A portable fire extinguisher (often referred to as APAR or Alat Pemadam Api Ringan) is your first line of defense against small fires in homes, offices, factories, and commercial vehicles. However, a fire extinguisher is only useful if it functions properly when you squeeze the lever.
One of the most frequent causes of fire extinguisher failure during an emergency is improper internal pressure. If the pressure is too low, the extinguishing agent will not expel with enough force to reach the flames. If the pressure is dangerously high, the cylinder risks catastrophic structural breach or component failure.
Fortunately, most stored-pressure fire extinguishers feature a small circular dial near the handle: the pressure gauge (manometer). Learning how to read this gauge accurately—and recognizing the difference between a normal reading, an abnormal reading, and a broken gauge—is a crucial life-safety skill.
This comprehensive guide breaks down everything you need to know about fire extinguisher pressure gauges according to professional fire safety engineering standards.
Table of Contents
What Is a Fire Extinguisher Pressure Gauge and How Does It Work?
A fire extinguisher pressure gauge is a mechanical measuring instrument mounted on the valve assembly of stored-pressure fire extinguishers (such as Dry Chemical Powder, Foam AFFF, or Water types).
How the Gauge Works
Most fire extinguisher pressure gauges use a tiny internal mechanism known as a Bourdon tube. The Bourdon tube is a curved, hollow metallic tube connected to the pressurized interior of the cylinder.
- When internal pressure increases, the curved tube tends to straighten out slightly.
- When internal pressure decreases, the tube curls tighter.
- This mechanical movement is translated through gears to move the indicator needle across the printed faceplate dial.
The gauge face is color-coded to allow instant visual evaluation without requiring complex calculations or technical background.
Note on CO2 Extinguishers: Carbon Dioxide (CO2) fire extinguishers generally do not feature a pressure gauge. CO2 is stored as a liquid under high pressure (approx. 800 – 900 PSI / 55 –62 bar at ambient temperature). Because liquid CO2 maintains constant vapor pressure until almost entirely depleted, pressure gauges cannot reliably indicate agent quantity. CO2 cylinders are inspected by weighing the unit rather than checking a gauge.
Anatomy of a Fire Extinguisher Pressure Gauge Dial
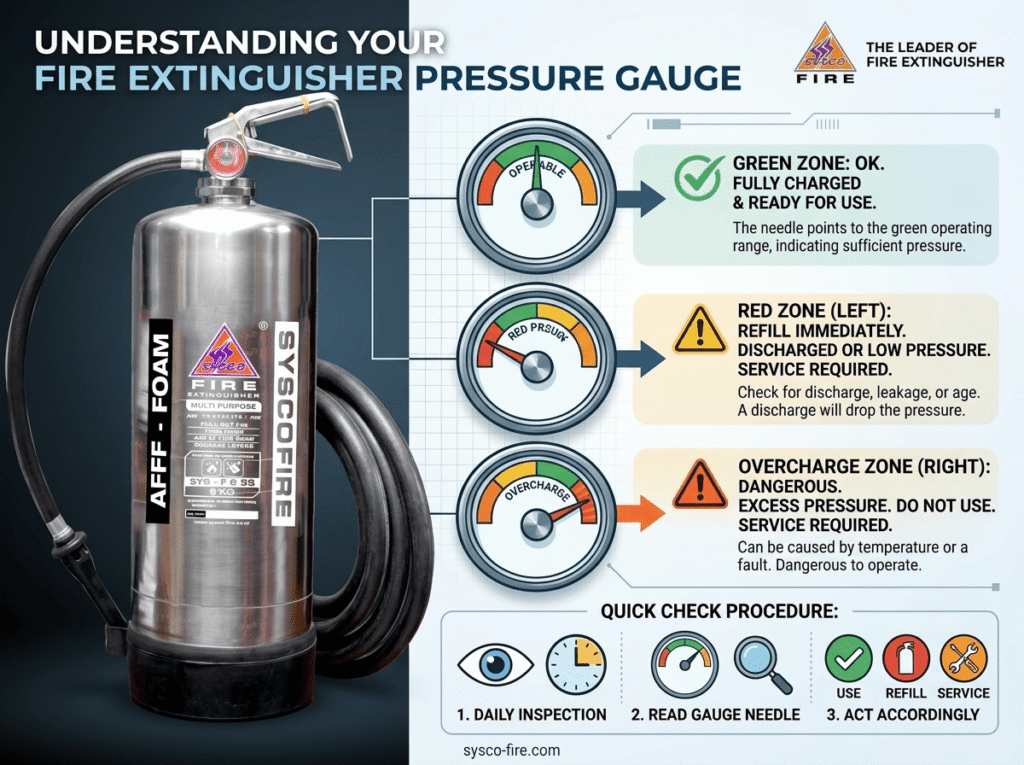
- The Green Zone (Operable Range): Located in the top-center of the dial faceplate. This represents the optimal working pressure calibrated for that specific extinguisher capacity and agent.
- The Red Zone Left (Undercharged / Recharge): Positioned to the left of the green section. Indicates inadequate pressure.
- The Red Zone Right (Overcharged / Danger): Positioned to the right of the green section. Indicates excessive pressure.
- The Indicator Needle: A high-contrast yellow or silver pointer that moves across the arc to show current internal pressure.
The 3 Primary Pressure Gauge Indicators Explained
Understanding how to read the needle position allows you to determine the immediate operational status of your safety equipment.
1. The Needle is in the Green Zone (Normal / Ready to Use)
Status: Fully Operable
When the indicator needle points strictly inside the green section, the fire extinguisher is properly charged and pressurized with propellant gas (typically compressed nitrogen or dry air).
- Working Pressure: Depending on the capacity and model, standard dry chemical powder extinguishers operate at an internal pressure between 10 to 15 bar (approx. 145 to 215 PSI).
- Action Required: None immediately. Ensure the safety pin and tamper seal are intact, wipe off surface dust, and document the monthly inspection on your maintenance tag.
2. The Needle Points to the Left Red Zone (Undercharged / Depressurized)
Status: Inoperable / Unsafe
If the pointer needle drifts into the left red zone (or points toward “Recharge” / “Low”), internal propellant pressure has dropped below the threshold required to discharge the extinguishing media.
Common Causes of Low Pressure:
- Slow Micro-Leaks: Degradation of O-ring rubber seals, loose valve fittings, or microscopic valve seat imperfections over time.
- Partial Discharge: Someone squeezed the trigger handle briefly—even for a fraction of a second—and replaced the safety pin. Once discharged, propellant gas escapes, leaving the cylinder underpressurized.
- Thermal Contraction: Storing extinguishers in extremely low ambient temperatures can cause gas pressure to drop temporarily.
The Risk:
In a fire scenario, an undercharged extinguisher may fail to discharge completely or throw the agent only a few inches, leaving the operator exposed to heat and flames.
- Action Required: Remove the unit from service immediately. Send it to a certified fire safety vendor for inspection, leak detection, and a complete propellant recharge.
3. The Needle Points to the Right Red Zone (Overcharged / High Pressure)
Status: Danger / Risk of Malfunction
When the indicator needle crosses into the right red zone (or “Overcharged”), internal pressure exceeds safe operating parameters.
Common Causes of High Pressure:
- Overfilling During Refill: Uncertified service technicians introducing excess nitrogen gas during maintenance or overfilling the liquid/powder agent.
- Extreme Heat Exposure: Direct exposure to strong sun rays, placement near boiler rooms, industrial ovens, or engine bays causes heat expansion of internal gases ( Gay-Lussac’s Law).
The Risk:
Extreme internal pressure puts severe strain on cylinder seams, valve stems, and discharge hoses. In severe cases, it can lead to valve rupture, uncontrolled agent discharge, or physical injury during operation.
- Action Required: Move the unit away from heat sources to a cool, shaded area. If the needle remains in the right red zone after cooling down, contact an authorized fire protection professional immediately to safely depressurize and calibrate the cylinder. Never attempt to bleed or vent pressure yourself.
How to Identify a Damaged or Broken Pressure Gauge
Sometimes, a pressure gauge gives a false reading. A needle pointing to the green zone does not guarantee safety if the gauge mechanism itself is damaged or jammed.
| Indicator | Normal Condition | Damaged / Faulty Gauge | Risk / Implication |
| Glass / Cover Lens | Clear, smooth, intact plastic/glass | Cracked, shattered, cloudy, or missing | Moisture & dust entry causing gear corrosion |
| Needle Movement | Moves smoothly under pressure test | Stuck at one position, bent, or detached | False reading (shows “Green” even if empty) |
| Internal Dial | Dry, clean, legible markings | Moisture droplets, rust, or fogged interior | Internal condensation, rusted Bourdon tube |
| Gauge Body | Threaded securely to valve head | Loose, dented, corroded threads | Propellant gas leaking from mounting point |
The “Stuck Needle” Test (Professional Inspection Tip)
During periodic technical overhauls, certified technicians verify gauge accuracy using a specialized testing manifold or tapping technique. If an extinguisher feels lightweight or has an expired service tag yet the needle remains rigidly in the green, the needle mechanism is likely stuck due to internal dust or corrosion. A faulty gauge must be replaced immediately.
Step-by-Step Checklist for Monthly APAR Inspections
According to international fire safety standards (such as NFPA 10) and local occupational health regulations (such as Indonesian Permenaker safety guidelines), every facility must perform a monthly visual inspection of all portable fire extinguishers.
Follow this 5-step checklist:
- Accessibility Check: Verify that the extinguisher is unobstructed, visible, and placed in its designated location/bracket.
- Gauge Inspection: Look directly at the pressure gauge faceplate. Confirm the needle is resting firmly inside the green operating zone.
- Physical Condition: Check for physical damage, deep rust, cracked discharge hoses, or blocked nozzles.
- Safety Pin & Tamper Seal: Ensure the metallic safety pull-pin is inserted through the valve handles and secured by an unbroken plastic tamper seal.
- Update Inspection Tag: Sign, date, and record the status on the inspection tag attached to the cylinder collar.
Summary & Conclusion
A fire extinguisher pressure gauge is a simple yet vital instrument that communicates the operational health of your fire suppression system.
- Green Zone: Normal, calibrated pressure. Safe and ready to use.
- Left Red Zone: Low pressure. Must be recharged immediately.
- Right Red Zone: Overcharged pressure. Needs professional cooling or depressurization.
- Damaged Glass/Stuck Needle: Mechanical failure. Gauge or unit requires immediate replacement.
Never assume a fire extinguisher will work simply because it sits on a wall bracket. Routine checks on the pressure gauge guarantee that when fire strikes, your equipment will perform reliably to protect lives and assets.
Baca juga : SOP APAR Klinik: 11 Hal yang Wajib Dicek agar Alat Pemadam Selalu Siap Digunakan.
Need High-Quality Fire Extinguishers & Certified Maintenance?

Ensure your home, workplace, and industrial properties are protected by fire safety equipment built to rigorous engineering standards.
For comprehensive fire safety solutions, trusted manufacturing, and certified equipment, consult thewebsite official https://sysco-fire.co.id.
To explore our full range of certified fire extinguishers—including Dry Chemical Powder, CO2 , and Foam units—visit our detailed https://sysco-fire.co.id/apar-alat-pemadam-api-kebakaran .
Have questions regarding unit inspections, procurement, or refills? Speak directly with our technical support team on WhatsApp at +62852-5711-4711 via our direct https://sysco-fire.co.id/cs.