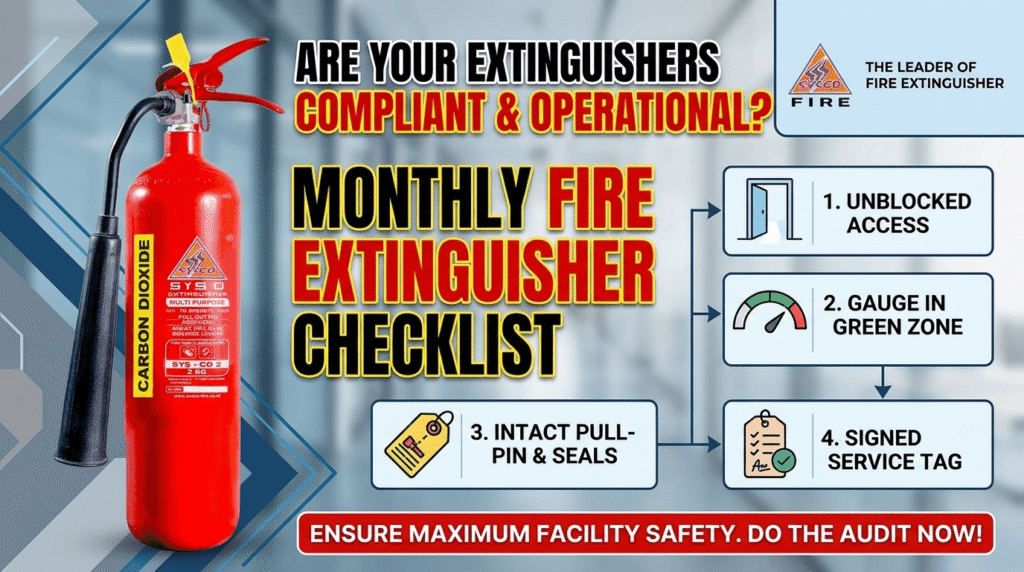
Fire extinguisher inspection checklist implementation is the single most critical routine procedure for maintaining workplace safety, regulatory compliance, and life-saving readiness. In an emergency, a fire extinguisher is your first line of defense against small fires becoming catastrophic blazes. However, an extinguisher is only as reliable as its last inspection. Without structured monthly checks, pressure leaks, clogged nozzles, missing safety seals, or internal chemical caking can render your equipment completely useless when every second counts.
According to national fire safety regulations (including the Indonesian Ministry of Manpower / Permenakertrans guidelines) and international standards like NFPA 10, fire extinguishers must undergo formal visual inspections at least once every 30 days. This comprehensive guide walks you through an actionable, step-by-step monthly inspection checklist, common red flags to watch for, and how certified fire equipment simplifies long-term facility maintenance.
Table of Contents
Why Monthly Extinguisher Inspections Are Non-Negotiable
A fire extinguisher is a pressurized mechanical vessel containing extinguishing agents that are under continuous storage stress. Over time, environmental exposure, human interference, and natural vibration can compromise the unit.
Routine monthly inspections deliver four vital benefits:
- Guaranteed Operational Readiness: Ensures the unit maintains adequate pressure and clear discharge pathways so it works instantly during a emergency.
- Regulatory & Audit Compliance: Meets local fire safety mandates, labor codes, and commercial building insurance requirements.
- Early Identification of Corrosion & Damage: Detects physical wear, mechanical leaks, or compromised seals before catastrophic failure occurs.
- Cost Savings & Asset Protection: Prevents expensive full-unit replacements by identifying minor repairable issues early.
The Complete Step-by-Step Fire Extinguisher Inspection Checklist
Follow this 7-step monthly checklist to conduct thorough visual and physical audits across all fire safety units in your commercial, industrial, or residential facility.
Step 1: Accessibility, Location, and Visibility Verification
Before examining the vessel itself, evaluate where and how the extinguisher is installed.
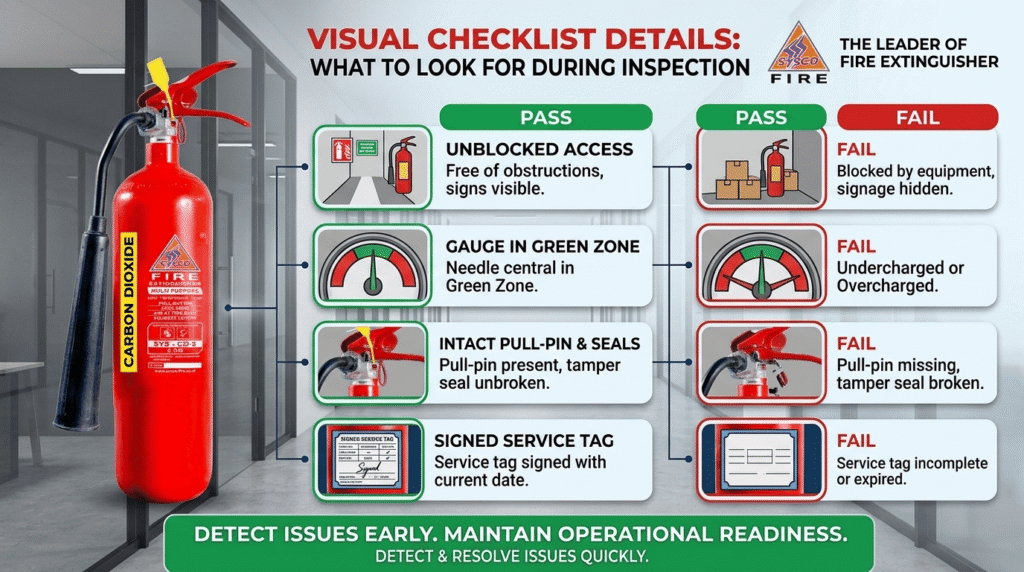
- Clear Access: Ensure the extinguisher is completely unobstructed. Remove any boxes, furniture, clothing, or inventory blocking access to the unit.
- Unobstructed Signage: Verify that high-visibility location signs above the unit remain visible from multiple angles across the room.
- Mounting Height & Stability: Check that the unit is securely mounted on its wall bracket or housed in an approved cabinet at the required height (typically 1.2 meters from the floor level).
Step 2: Physical Cylinder & Shell Inspection
Inspect the exterior cylinder body for mechanical damage or environmental degradation.
- Corrosion & Rust: Examine the vessel body, base, and welded seams for rust, flaking paint, or chemical pitting. Corrosion weakens cylinder integrity under pressure.
- Dents & Cracks: Inspect for deep dents, gouges, or structural deformities caused by accidental impacts.
- Cleanliness: Remove accumulated dust, grease, or chemical residues from the cylinder shell and operating instructions label.
Step 3: Pressure Gauge Verification (For Stored-Pressure Units)
The pressure gauge provides immediate visual feedback on the vessel’s internal propellant charge.
- Green Zone Alignment: Verify that the pressure indicator needle sits squarely within the green central region.
- Overcharged Risk (Red Zone Right): If the needle tilts into the high-pressure red zone, high ambient temperatures or overfilling may endanger cylinder stability.
- Undercharged Risk (Red Zone Left / RECHARGE): If the needle drops into the low-pressure zone, internal propellant has leaked. The extinguisher must be removed from service immediately for professional recharging.
- Note for CO2 Extinguishers: Carbon dioxide units do not feature pressure gauges. Operational readiness must be verified by weighing the cylinder against its stamped gross weight (TW/Gross Weight).
Step 4: Safety Pin and Tamper Seal Verification
The pull pin and tamper seal prevent accidental discharge while ensuring the unit has not been tampered with or used.
- Intact Pull Pin: Check that the metal pull pin passes completely through the operating lever and handle.
- Unbroken Tamper Seal: Confirm the plastic pull-pin tamper seal is intact and locked tightly. A broken or missing seal indicates potential unauthorized use or missing pressure.
Step 5: Hose, Nozzle, and Discharge Assembly Check
The discharge pathway must remain clear to allow unhindered agent flow during operation.
- Blockage Check: Inspect the nozzle horn or hose tip for dirt, insects, nesting wasps, or dried extinguishing agent.
- Hose Integrity: Flex rubber hoses gently to inspect for cracks, dry rot, weathering, or loose threaded connections.
- Secure Storage: Ensure the hose is properly clipped into its retaining bracket on the side of the cylinder shell.
Step 6: Agent Condition & Agitation (Dry Chemical Units)
Dry chemical powder (ABC monoammonium phosphate) can settle and pack tightly at the bottom of the cylinder due to gravity and facility vibration.
- Invert and Agitate: Unhook dry powder extinguishers, invert them upside down, and shake gently or tap the base lightly with a rubber mallet. You should feel the powder shift freely inside the cylinder.
- Weight Verification: Weigh the unit to confirm it matches the manufacturer’s specified weight listed on the nameplate label.
Step 7: Inspection Tag & Log Documentation
A physical inspection is incomplete without accurate documentation.
- Tag Signing: Sign or initial the attached physical service tag on the unit, recording the exact date of inspection.
- Digital Log Record: Update your facility’s digital safety log or building management system (BMS) with unit ID, location, gauge status, and inspector signature.
Summary Matrix: Quick Monthly Inspection Reference
| Inspection Step | What to Check | Pass Condition | Action Needed if Failed |
|---|---|---|---|
| 1. Accessibility | Pathway & Signage | 100% unobstructed, visible signs | Clear obstruction immediately |
| 2. Pressure Gauge | Needle Position | Centered in Green Zone | Recharge or replace unit |
| 3. Safety Seal | Plastic Tamper Seal | Intact, unbroken, locked | Install new seal / inspect agent |
| 4. Physical Shell | Cylinder Body | No rust, dents, or chemical pitting | Remove unit from service |
| 5. Hose & Nozzle | Discharge Pathway | Clean, flexible, crack-free | Replace hose or clean nozzle |
| 6. Documentation | Service Tag & Log | Signed with current date | Complete log entry |
Common Red Flags and Immediate Corrective Actions
If an extinguisher fails any point on your monthly checklist, follow this mandatory safety protocol:
- Tag Out the Unit: Attach a high-visibility “OUT OF SERVICE” tag to the handle immediately to prevent anyone from relying on it during a fire.
- Deploy a Replacement Unit: Never leave a fire zone unprotected. Place an operational, certified standby extinguisher in the exact location while the primary unit is serviced.
- Contact a Certified Fire Protection Partner: Send the faulty extinguisher to a certified fire safety manufacturer for hydrostatic testing, seal replacement, or professional refill service.
The Role of Quality Manufacturing & Certification in Low-Maintenance Safety
Conducting monthly inspections becomes significantly more reliable when your facility is equipped with high-grade, certified fire safety equipment. Cheap, uncertified extinguishers constructed from low-grade metals or fitted with inferior seals frequently suffer from premature pressure loss, valve leakage, and internal powder caking.
By choosing equipment built to national standards (SNI Certification) and verified through rigorous Damkar Laboratory Testing, facilities benefit from:
- Corrosion-Resistant Seamless Cylinders: Built to withstand high working pressures and harsh ambient humidity.
- High-Precision Pressure Gauges & Valve Assemblies: Eliminating micro-leaks that cause unexpected pressure drops.
- Certified Suppression Agents: Pure ABC dry powder or high-purity CO2 agents that do not cake or degrade prematurely over time.
Conclusion & Actionable Summary
A structured monthly inspection checklist transforms passive safety equipment into a guaranteed active defense system. By spending just two minutes per unit each month checking accessibility, pressure gauges, physical integrity, safety seals, and discharge hoses, facility managers protect lives, maintain regulatory compliance, and avoid catastrophic fire losses.
Baca juga:Tingkat Training Damkar Kemnaker: 4 Level Kompetensi yang Wajib Dipahami Sebelum Sertifikasi.
Ensure 100% Fire Preparedness with Sysco Fire
Is your facility due for a safety audit or needing certified, long-lasting fire extinguishers that pass every inspection with confidence?
- Official Manufacturer Website: Discover our full range of certified fire suppression solutions by visiting the official website of Sysco Fire Manufacturer.
- Explore Our Product Line: Review technical specifications and catalog details directly at our APAR Product Catalog Page.
- Direct Expert Consultation: Speak directly with our certified fire safety specialists today. Contact Sysco Fire Customer Support via WhatsApp (+62852-5711-4711) for immediate assistance, official quotes, or maintenance scheduling.